
You've recorded the lessons, made the worksheets or planned the live sessions. Then you look into selling them, and suddenly you're comparing course platforms, building a student portal and choosing an email system. The teaching is ready. The software project isn't.
You don't need to build a school to find out whether people will buy your course. To sell online courses, you need a clear offer, a way to take payment and a reliable way to deliver what you've promised. A payment link can handle the middle part while you teach through tools you already know.
This guide takes that lightweight route: sell a manageable first intake, learn what students need and add a course platform only when it solves a real problem.
Sell one useful outcome before building a whole school
Start with the person you already help. What should they be able to do after your course that they can't do now? “Beginner photography” is a topic. “Take sharp, well-lit product photos with your phone” gives a potential student something to judge.
For example, a photography tutor could package four existing videos, a PDF lighting checklist and one live feedback session into a first course. That is a complete offer without a large library of lessons. These are illustrative teaching and pricing examples, not earnings predictions.
Put the offer on one page before inviting anyone to pay. Explain:
- Who it's for and the outcome: include any experience or equipment students need.
- What they receive: lesson format, approximate time commitment, feedback and support.
- When it happens: live dates and time zone, or when recordings become available.
- How long access lasts: don't promise lifetime access to files you may move or stop hosting.
- What it costs: currency, total price, payment schedule and applicable taxes.
- What happens if plans change: refund and cancellation terms, and a contact address.
Share it first with people who have already asked for help: tutoring clients, workshop attendees or readers on your mailing list. Give them a sample lesson and a specific invitation to join, rather than only asking whether the idea sounds interesting. A paid place tests willingness to buy; it doesn't yet prove that the course delivers results.
If you need a minimum class size, publish the decision date and what you'll refund if it doesn't run. If any lessons are still to be made, say so before taking money.
Choose a price that matches the teaching
Keep your first offer easy to understand. One price is enough to launch; add another option when it removes a genuine obstacle for students.
One-off payment: a defined course
Use a single payment for a recording bundle, a short workshop or a fixed course with a clear end. For example, £250.00 could cover the videos, worksheets and feedback session together. State whether future updates or repeat attendance are included rather than leaving students to assume they are.
Payment plan: the same course, spread over time
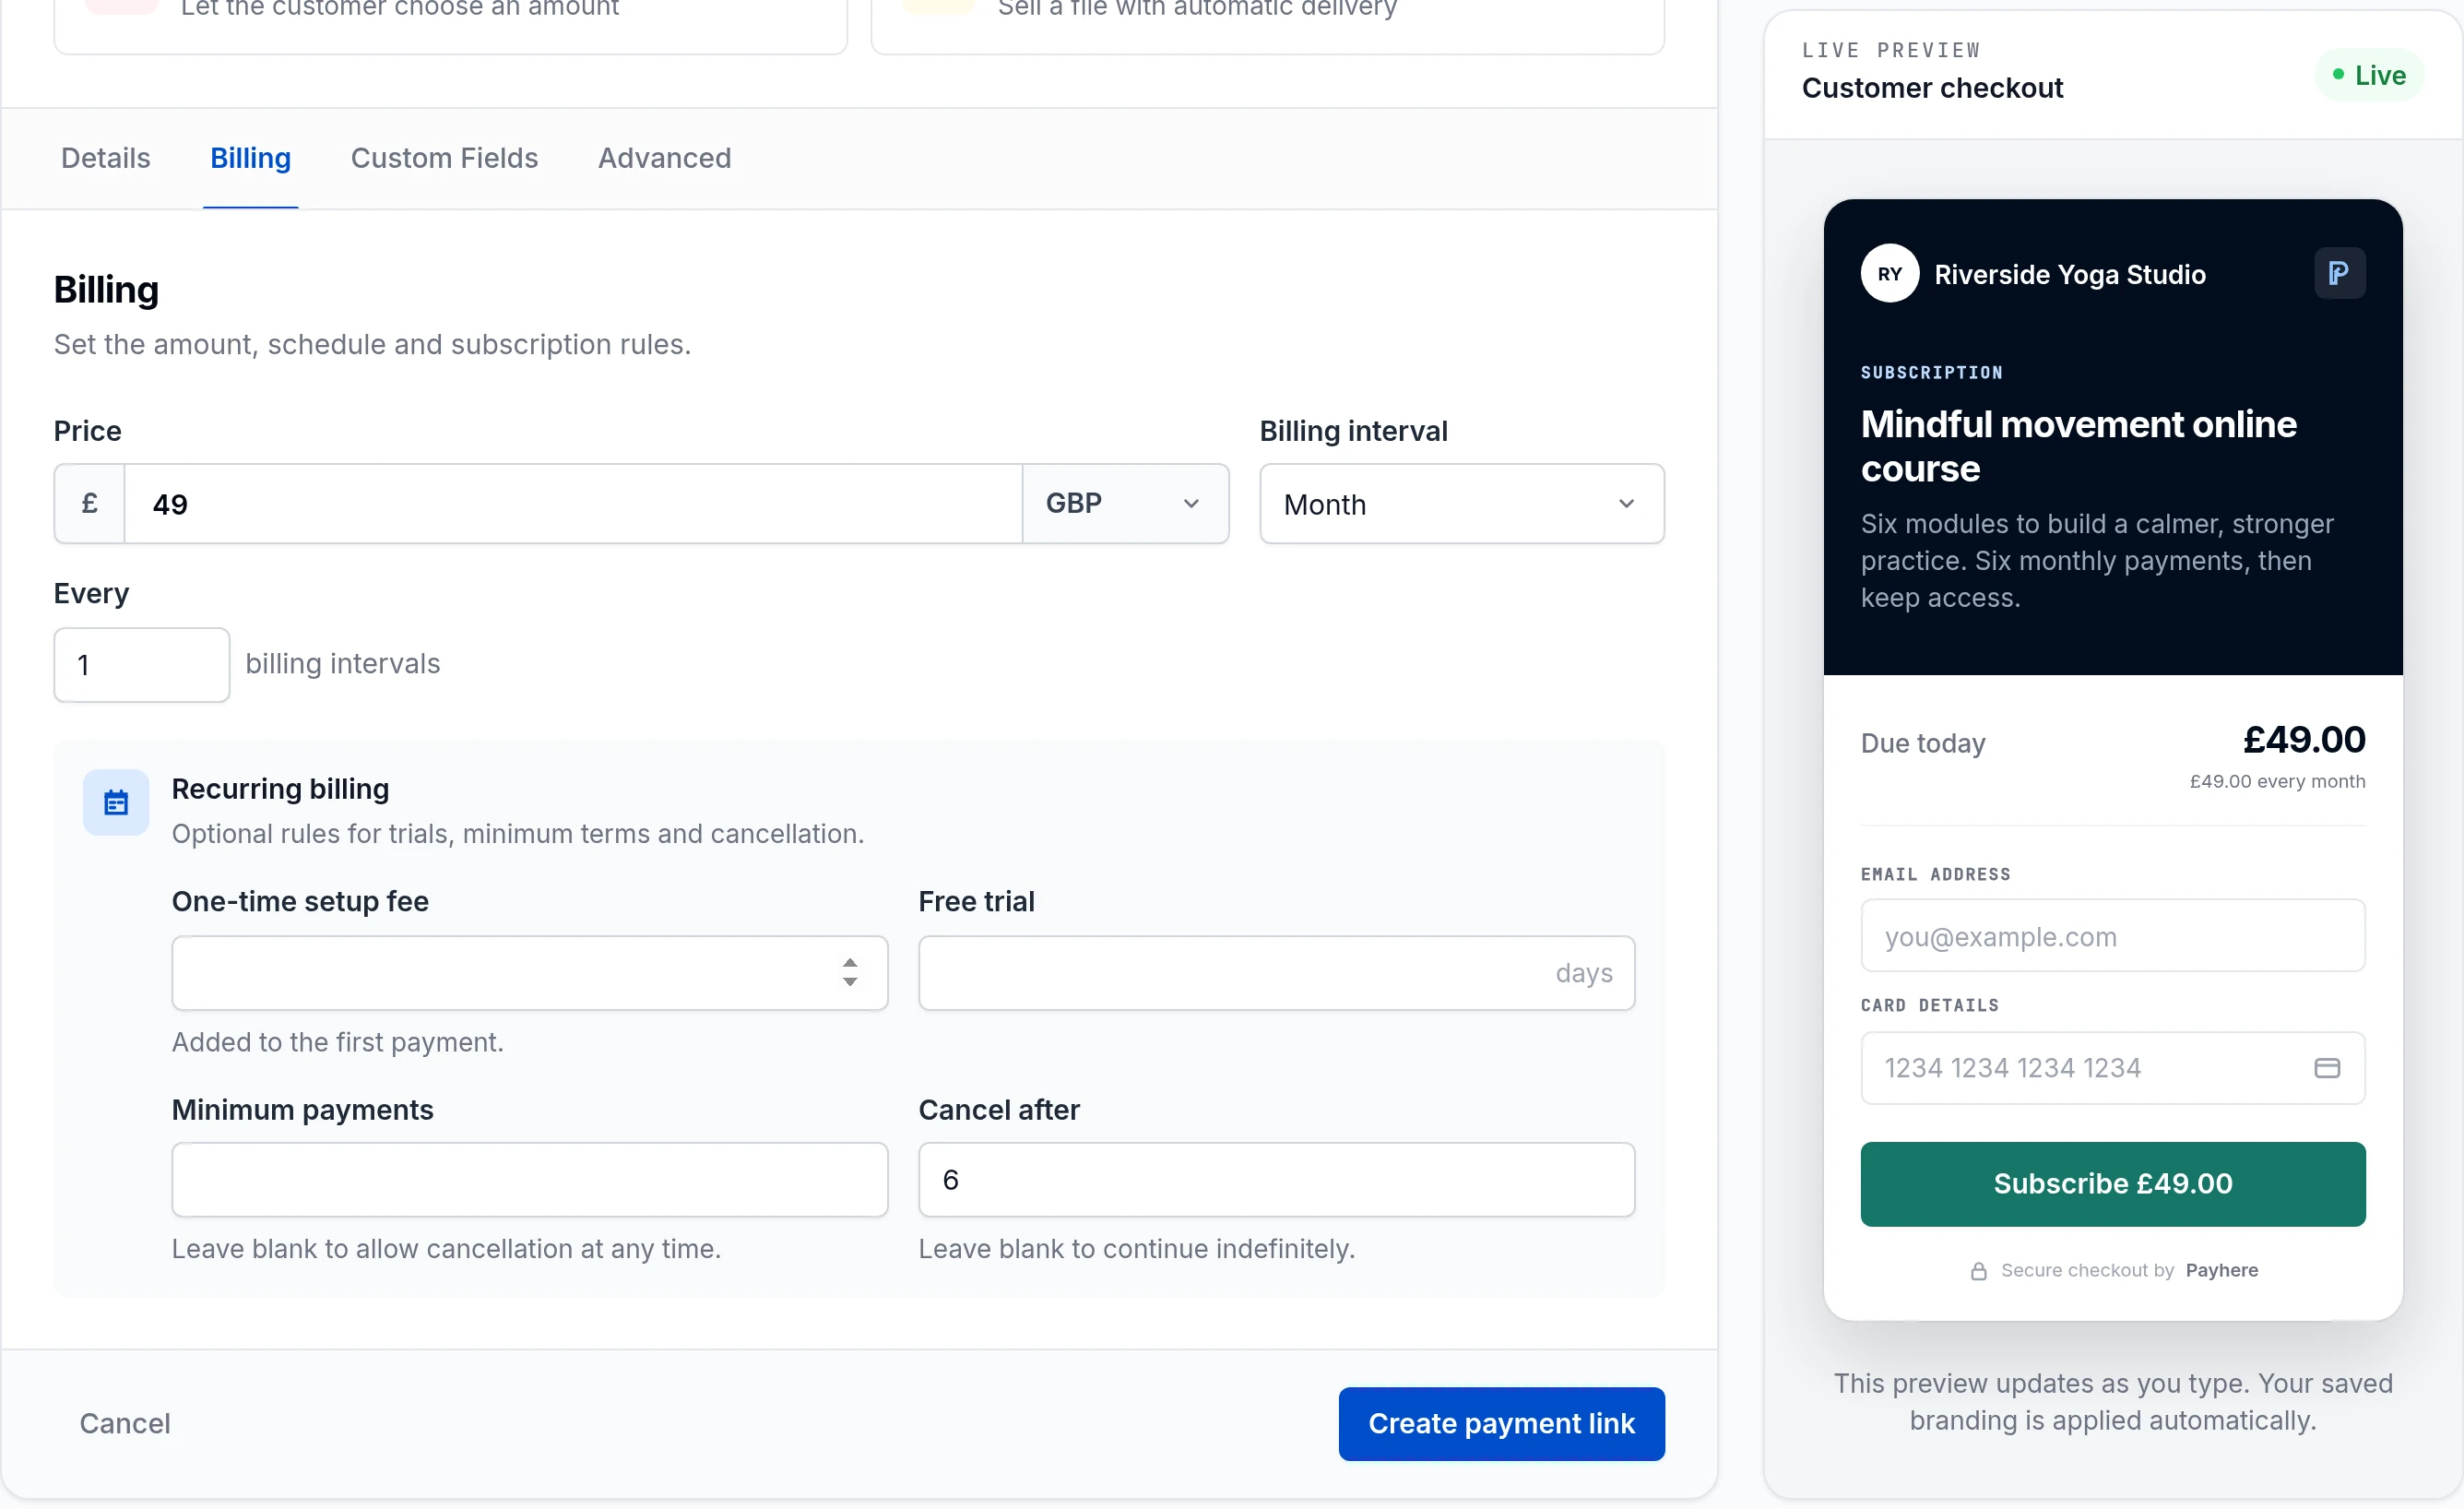
Instalments can make a higher-priced course easier to budget for. You might offer £250.00 upfront or six monthly payments of £49.00, totalling £294.00. Explain the higher total plainly and show both schedules beside the enrolment buttons.
In Payhere, use Cancel after for a finite number of recurring payments. For this example, set it to six. A minimum term is not an automatic stop, and scheduled charges are not guaranteed to succeed. Decide how you'll handle a missed payment and communicate that policy before purchase.
The payment plans guide explains these billing settings in more detail.
Subscription or cohort: distinguish ongoing teaching from a fixed intake
An ongoing subscription suits an ongoing promise: monthly coaching calls, new lessons or a continuing practice group. Explain what arrives each month, how cancellation works and when access ends.
A cohort just means students learn together over the same dates. It doesn't have to be a subscription. A six-week class can have one upfront price or a finite payment plan; don't leave it renewing indefinitely just because the sessions happen weekly.
Decide exactly how students will get their lessons
Delivery is where a lightweight setup needs care. Payhere collects payment; it isn't a course host or a protected learning portal. A receipt does not enrol someone in your teaching tools, and a shared link is not protected course access.
You can still give students a straightforward experience:
- Videos: host them with your existing video provider and email an ordered lesson list. Check the provider's commercial-use terms and privacy settings. Unlisted links can be forwarded; use a service with individual access controls if that risk is unacceptable.
- PDFs and worksheets: email attachments or grant access to a folder in a tool such as Google Drive. Test permissions from a different account, not just your own. Downloaded files can be copied even if you later remove folder access.
- Live sessions: send the meeting invitation and calendar details after confirming payment. Include the time zone, preparation and recording policy. Use your meeting tool's admission controls rather than publishing the session link on your sales page.
For a small intake, keep a private enrolment sheet: student email, payment status, cohort, access sent and any follow-up needed. Check payments in Payhere before granting access, then record what you've sent. If you later automate delivery through a separate integration, test successful payments, failures and cancellations; don't assume connecting tools handles every case.
Write the welcome email now so you're not improvising after the first sale. For example:
Hi [first name], thanks for joining [course name]. Your first lesson is at [lesson link], and your worksheets are at [folder link]. Our live session is [date, time and time zone]; join using [meeting details]. You'll have access until [date]. If anything won't open, reply to [support email] and I'll help.
Adapt that message to your format and send it individually. Tell buyers before checkout when to expect it, particularly if you're granting access manually and can't respond immediately.
Connect payment to that delivery process
Once the offer and welcome message are ready, set up the payment link:
- Connect your Stripe account to Payhere. Create a one-off link, a finite payment plan or an ongoing subscription to match your written offer. Check the currency and full schedule.
- Add the saved link to your course page. Label the button with the commitment: “Pay £250.00 in full” or “Pay £49.00 monthly for 6 months”. If you offer both, each button needs its own matching link.
- Explain the next step after payment. You can configure a success URL for standalone checkout to send buyers to a page explaining when access will arrive. Don't put private lesson links on a publicly reachable thank-you page or treat a visit as proof of payment.
- Rehearse the student journey. Open each button as a visitor, inspect checkout and test your delivery links from an account without owner permissions. Check that your welcome message matches the dates and access terms on the offer page.
See the course payments overview for where payment links fit. For several courses, a storefront can gather your payment options; it still doesn't become a lesson library.
When Teachable or Kajabi is worth the extra setup
The lightweight route works best when you're teaching a small group, testing demand or selling a simple bundle. You reuse familiar tools and can change the offer without rebuilding a curriculum inside another system. The cost is your time: sending invitations, fixing permissions and keeping payment and access records aligned.
Platforms such as Teachable and Kajabi bring course content, learner access and progress tracking into a dedicated learning environment. That structure can be worth paying for when students need one login, a clear lesson sequence or progress records. Check the current plan for the specific features you need rather than assuming every tier includes them.
Don't compare only the headline subscription price. Include payment processing, any platform transaction charges, video storage, other paid tools and your admin time. Check your tax responsibilities too; a payment link isn't a substitute for tax advice.
Move when the work tells you to: repeated access problems, too many manual enrolments or a course that genuinely needs quizzes and completion tracking. There's no magic student count. If those requirements exist before launch, choose a course platform now rather than creating a manual process you'll immediately outgrow.
Launch one intake, then improve what students actually need
Your first launch doesn't need a catalogue. It needs one useful promise, a price people can understand and lessons they can reliably open. After teaching, ask where students got stuck and what helped them make progress. Improve that before adding more software or more modules.
Choose the course you're ready to deliver, write the welcome email and connect its payment link to your offer page. You can build the bigger school once you know what deserves a place in it.
Create your course payment link